Mazda 3 Service Manual: Rear Heat Duct Removal/Installation
1. Disconnect the negative battery cable..
2. Remove the following parts:
a. Upper panel.
b. Shift lever knob (MTX).
c. Selector lever knob (ATX).
d. Shift panel.
e. Side wall.
f. Console.
g. Front scuff plate.
h. Front side trim.
i. Fuel-filler lid opener lever cover.
3. Turn the floor covering over.
4. Remove in the order indicated in the table.
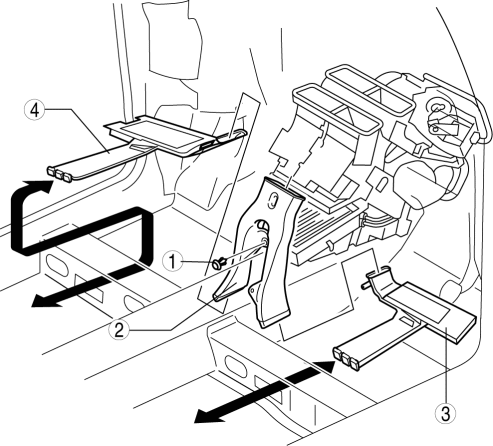
|
1 |
Fastener |
|
2 |
Rear heat duct (1) |
|
3 |
Rear heat duct (2) |
|
4 |
Rear heat duct (3) |
5. Install in the reverse order of removal.
 Heater Core Inspection
1. Inspect the heater core for damage, cracks, and water leakage.
If there is any malfunction, replace the heater core.
2. Visually inspect the fins for bending.
If there is any ...
 A/C
A/C
...
Other materials:
Fuel Gauge Sender Unit Removal/Installation
MZR 2.0, MZR 2.5
NOTE:
Fuel pump unit cannot be disassembled.
1. Remove the fuel gauge sender unit..
MZR 2.3 DISI Turbo
NOTE:
Fuel pump unit cannot be disassembled.
1. Remove the fuel gauge sender unit..
SKYACTIV-G 2.0
NOTE:
Fuel pump unit cannot be disasse ...
Transaxle Range (TR) Switch Inspection [FS5 A EL]
CAUTION:
Water or foreign objects entering the connector can cause a poor connection
or corrosion. Be sure not to drop water or foreign objects on the connector
when disconnecting it.
Operation Inspection
1. Perform the following procedures to inspect the TR switch.
If t ...
LCA (Lane Change Assist)
LCA functions
In the Subaru Solterra, the Lane Change Assist (LCA) system works in conjunction
with Lane Tracing Assist (LTA) to support smoother and more controlled lane changes.
By applying subtle steering inputs, the Subaru Solterra helps guide the vehicle
into the adjacent lane when condi ...
