Mazda 3 Service Manual: Wheel Balance Adjustment
CAUTION:
-
Adjust the outer wheel balance first, then the inner wheel balance.
-
Be careful not to scratch the wheels.
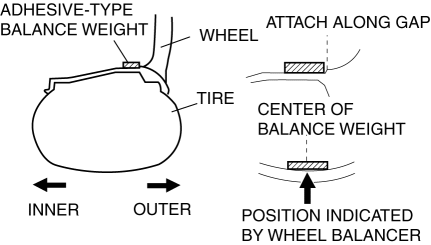
Adhesive-type Balance Weight (Outer)
1. Remove the old balance weight from the wheel.
2. Remove the double-sided adhesive tape remaining on the wheel, then clean and degrease the bonding area.
3. Set the wheel on a wheel balancer, measure the amount of unbalance and the position with the mode set for knock-type balance weight.
4. Multiply the amount of unbalance by 1.6
to obtain the balance weight value.
5. Select a balance weight closest to the weight value and attach the balance weight on the position (outer) indicated by the wheel balancer.
-
Example calculation of balance weight value
-
Indicated amount of unbalance: 23 g {0.81 oz}
23 g {0.81 oz}×1.6 = 36.8 g {1.30 oz}
-
Selected balance weight value: 35 g {1.24 oz}
NOTE:
-
When selecting a balance weight, select one closest to the calculated value.
Example: 32.4 g {1.14 oz} = 30 g {1.06 oz}
CAUTION:
-
Use a genuine balance weight or equivalent (steel).
-
When attaching the weight, press the weight with a force of 25 N {2.5 kgf, 5.5 lbf} per 5 g for 2 s or more.
6. If attaching two balance weights, position them so that each is on either side of the position indicated by the wheel balancer.
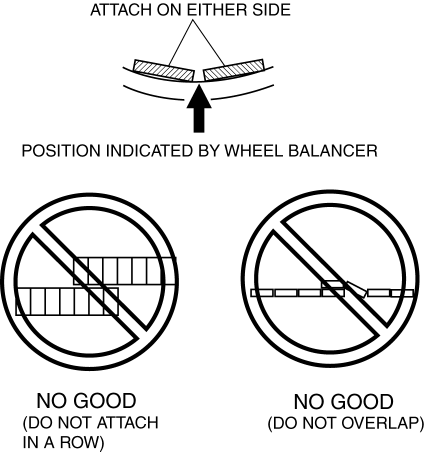
CAUTION:
-
Do not attach weight balances in a row.
-
Do not overlap the balance weights.
-
Total weight must not exceed 160g {5.65 oz}.
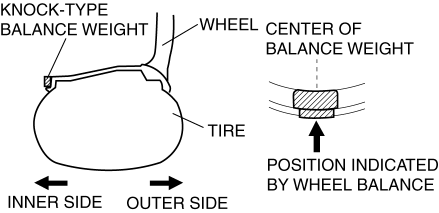
Knock-type Balance Weight (Inner)
1. Measure the amount of unbalance with a wheel balancer.
2. Attach a weight corresponding to the measured weight value on the position (inner) indicated by the wheel balancer.
CAUTION:
-
Do not attach three or more balance weights.
-
One balance weight must not exceed 60g {2.12 oz}, and a total of tow balance weights must not exceed 100g {3.53 oz}.
Remaining Amount of Unbalance Confirmation
1. After installing the outer and inner balance weights, operate the wheel balancer again.
2. Confirm that the remaining unbalance does not exceed the following on either side.
-
If the remaining unbalance exceeds the specifications, adjust the wheel balance again.
|
Outer (Adhesive-type) |
Inner (Knock-type) |
|
|
16 inch wheel |
14 g {0.49 oz} |
9 g {0.3 oz} |
|
17 inch wheel |
13 g {0.46 oz} |
8 g {0.28 oz} |
|
18 inch wheel |
12 g {0.42 oz} |
8 g {0.28 oz} |
 Wheel Alignment Pre Inspection
1. Park the vehicle on a level ground, in an unloaded condition*, and with the
wheels straight forward.
*: Unloaded condition.....Fuel tank is full. Engine coolant and engine oil are
at specifie ...
 Wheel Unit ID Registration
NOTE:
After the wheel unit replacement, registration of the wheel unit identification
codes must be performed.
ID registration can be done using the M-MDS, or not using the M-MDS.
...
Other materials:
Recommended Oil
U.S.A., Canada, and Puerto Rico
Use SAE 0W-20 engine oil.
Mazda Genuine Oil is used in your
Mazda vehicle. Mazda Genuine 0W-20
Oil is required to achieve optimum fuel
economy.
For maintenance service, Mazda
recommends Mazda Genuine Parts and
Castrol ® (U.S.A. only).
Only use SAE 0W ...
Variable Swirl Solenoid Valve Inspection [Mzr 2.3 Disi Turbo]
Airflow Inspection
1. Remove the battery cover..
2. Disconnect the negative battery cable..
3. Remove the variable swirl solenoid valve..
4. Inspect the airflow between the ports under the following conditions.
If not as specified, replace the variable swirl solenoid valve..
...
Intake Air Temperature (Iat) Sensor Inspection [Mzr 2.0, Mzr 2.5]
Resistance Inspection
NOTE:
Because the IAT sensor is integrated in the MAF sensor, replacing the IAT
sensor includes replacement of the MAF/IAT sensor.
1. Remove the battery cover..
2. Disconnect the negative battery cable..
3. Disconnect the MAF/IAT sensor connector.
4. Mea ...
