Subaru Solterra 2023-2026 Owner's Manual: X-MODE
The Subaru Solterra X-MODE system is engineered to significantly enhance off-road stability, traction, and control, allowing the vehicle to confidently handle challenging terrains beyond standard road conditions.
Within the Subaru Solterra, the driver can choose between two specialized driving modes: SNOW/DIRT and D.SNOW/MUD, each optimized for different low-grip environments and surface conditions.
When "X-MODE" is activated, the integrated downhill assist control automatically modulates braking force to help maintain a steady and controlled speed when descending steep slopes, reducing the need for manual braking input and improving overall safety.
Grip control in the Subaru Solterra works intelligently to assist the driver by maintaining a consistent low speed when climbing steep inclines or navigating slippery terrain, eliminating the constant need to operate the accelerator or brake pedals and ensuring smoother progress.
WARNING
■ Important precautions before activating "X-MODE"
Failure to follow these instructions may increase the risk of loss of control or unexpected incidents while driving.
- Always confirm that the SNOW/DIRT or D.SNOW/MUD indicator is illuminated before proceeding, ensuring the Subaru Solterra is correctly set for the selected terrain.
- Keep in mind that "X-MODE" enhances traction support but does not extend the physical limitations of the Subaru Solterra. Carefully evaluate road conditions, obstacles, and route safety before continuing.
■ Situations where the system may not operate as expected
Under certain extreme driving conditions, maintaining a stable vehicle speed may be difficult, potentially leading to hazardous situations.
- Very steep or uneven inclines that exceed the system’s designed capability
- Highly irregular or rugged terrain surfaces
- Extremely slippery environments, including icy or heavily snow-covered roads
System Components
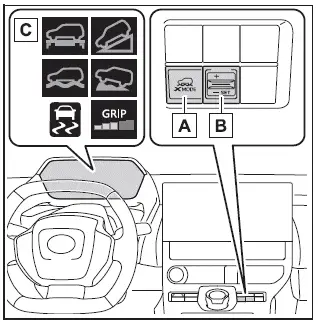
- "X-MODE" activation switch
- Grip control activation switch
- Mode and system status indicators
Selecting the Drive Mode
To select the desired X-MODE setting in the Subaru Solterra, press the "X-MODE" switch repeatedly while the vehicle is stationary or moving at speeds below approximately 13 mph (20 km/h). Each press cycles through the available terrain modes.
Whenever the drive mode is changed, an audible signal confirms the selection to the driver.
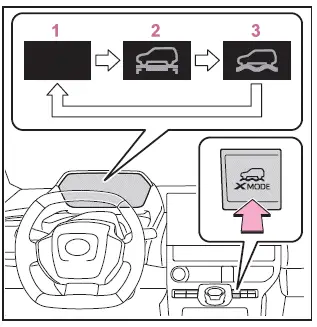
- Normal mode
Provides a well-balanced combination of energy efficiency, quiet cabin operation, and overall driving comfort, making it ideal for everyday urban driving in the Subaru Solterra. - SNOW/DIRT mode
Designed for conditions where tire slippage is likely, such as snowy roads or loose gravel surfaces, this mode minimizes wheel spin and improves traction for smoother vehicle control.When activated, the SNOW/DIRT indicator illuminates in green on the instrument cluster of the Subaru Solterra, confirming system engagement.
- D.SNOW/MUD mode
Specifically intended for extreme conditions like deep snow or mud, this mode temporarily adjusts traction control behavior, allowing controlled wheel spin to help the Subaru Solterra regain movement when stuck.In this mode, the D.SNOW/MUD indicator lights up in green, while additional indicators such as the VSC OFF and PCS warning lights may also illuminate on the display panel.
■ When "X-MODE" is unavailable
The Subaru Solterra X-MODE system will not activate under the following conditions:
- When the EV system of the Subaru Solterra is not powered on
- When neither SNOW/DIRT nor D.SNOW/MUD mode is selected
- When "S PEDAL DRIVE" mode is currently active
- When the Advanced Park function is in operation (if equipped)
- When a system malfunction is detected within the EV system
■ About Dynamic Radar Cruise Control or Cruise Control
When using X-MODE in the Subaru Solterra, certain driver assistance systems such as cruise control may have limited functionality or be temporarily unavailable depending on terrain conditions. This ensures that vehicle control remains optimized for safety and traction rather than speed maintenance. Always prioritize manual control in demanding off-road scenarios for the best driving outcome.
Additionally, when operating the Subaru Solterra in challenging environments, maintaining steady steering input and anticipating terrain changes can further enhance the effectiveness of X-MODE and improve overall vehicle stability.
Within the Subaru Solterra, Dynamic Radar Cruise Control and conventional cruise control functions are disabled whenever "X-MODE" is engaged. If either of these systems is active at the moment "X-MODE" is selected, they will be automatically canceled to ensure that the vehicle’s traction-focused systems take full priority.
■ During "X-MODE"
- While operating in "X-MODE" on the Subaru Solterra, the Vehicle Stability Control (VSC) system behavior is fixed and cannot be manually toggled. In SNOW/DIRT mode, VSC remains constantly enabled to enhance stability, whereas in D.SNOW/MUD mode it is intentionally disabled to allow controlled wheel spin for better mobility in deep or loose surfaces.
- During "X-MODE" operation, switching to other driving configurations such as Eco mode, alternative drive modes, or activating "S PEDAL DRIVE" is not permitted. The Subaru Solterra prioritizes terrain-specific performance and locks these options to maintain consistent traction behavior.
- The SNOW/DIRT and D.SNOW/MUD modes are specifically calibrated to maximize traction and torque delivery on uneven or slippery surfaces. As a result, the Subaru Solterra may experience increased energy consumption compared to normal driving conditions, which is a natural trade-off for enhanced off-road capability.
■ "X-MODE" Automatic Release
- The "X-MODE" system in the Subaru Solterra is automatically deactivated when the power switch is turned OFF, ensuring the vehicle returns to its default driving configuration.
- If the vehicle speed exceeds approximately 25 mph (40 km/h), "X-MODE" is disengaged automatically. At this point, the indicator on the instrument cluster changes to white, and the Subaru Solterra transitions back to Normal mode.
- When the vehicle slows down to approximately 22 mph (35 km/h) or below, the system can automatically re-engage, and the "X-MODE" indicator illuminates in green, restoring the previously selected mode.
■ Cautions regarding the use of the system
For safety and system integrity, certain driver inputs are restricted while "X-MODE" is active in the Subaru Solterra.
- Drive mode select switch operations are temporarily disabled
- "S PEDAL DRIVE" functionality cannot be engaged or changed
When selecting "X-MODE", Downhill Assist Control
Once "X-MODE" is activated and either SNOW/DIRT or D.SNOW/MUD mode is selected in the Subaru Solterra, the Downhill Assist Control system automatically enters a standby condition and becomes ready to assist under defined parameters.
- The system activates when vehicle speed is approximately 18 mph (30 km/h) or lower
- The system operates only when neither the accelerator pedal nor the brake pedal is being pressed
■ When changing the target vehicle speed
To adjust the controlled descent speed in the Subaru Solterra, lightly operate the accelerator or brake pedal. Once the pedal is released, the system maintains the newly set speed, allowing precise and stable control on steep declines.
■ Downhill Assist Control during "X-MODE"
- In both SNOW/DIRT and D.SNOW/MUD modes, Downhill Assist Control can remain in standby and activate automatically when conditions are met. The indicator status on the Subaru Solterra dashboard changes according to system activity, providing clear feedback to the driver.
- When the system is in standby and not actively controlling the vehicle, the indicator illuminates in white.
■ When Downhill Assist Control is not available when selecting "X-MODE"
The Downhill Assist Control system in the Subaru Solterra will not function under the following conditions:
- When neither SNOW/DIRT nor D.SNOW/MUD mode is selected
- When the shift position is set to P (Park)
- When Grip control is currently active
- When a malfunction is detected in the braking system or EV system
When using Grip control
To activate Grip control in the Subaru Solterra, ensure that SNOW/DIRT or D.SNOW/MUD mode is selected, then press the Grip control switch. This system is particularly useful for maintaining steady movement over challenging terrain without continuous pedal input.
Once activated, the Downhill Assist Control indicator will turn off, and the Grip control indicator will illuminate, signaling that the system has taken over low-speed traction management.
When activating Grip control while the vehicle is stationary, firmly press the brake pedal before operating the switch. This precaution helps prevent unintended vehicle movement, especially when positioned on an incline.
■ Set the speed of the Grip control
The desired Grip control speed in the Subaru Solterra can be adjusted by pressing the switch upward or downward, typically within a range of approximately 2 to 6 mph (2 to 10 km/h). The selected speed is displayed clearly on the multi-information display, allowing the driver to monitor and fine-tune low-speed off-road performance with confidence. Proper use of this feature can significantly improve control when navigating steep, uneven, or slippery surfaces.
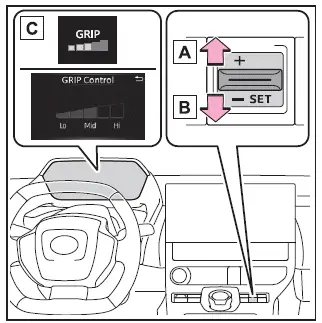
- Increase Speed
- Decrease Speed
- Indicator Lights
■ Grip control Operations
During active operation of the Grip control system in the Subaru Solterra, the indicator illuminates in green to confirm that the system is fully engaged and maintaining the selected low-speed driving condition. If the Grip control indicator appears white, release the brake pedal to allow the system to transition into active mode and begin regulating vehicle movement.
While Grip control is functioning in the Subaru Solterra, the driver retains the ability to temporarily adjust speed using the accelerator or brake pedal. Once pedal input is released, the system smoothly returns to the previously set speed, ensuring stable and predictable progress across uneven or slippery terrain.
■ When Grip control is released
- Press the "X-MODE" switch
When Grip control is deactivated in the Subaru Solterra, the corresponding indicator light turns off. Shortly after, the Downhill Assist Control indicator will illuminate, indicating that the system has reverted to its standby assistance mode.
Exercise caution when disengaging Grip control while the Subaru Solterra is in motion, as vehicle behavior may change depending on surface conditions and incline.
■ Grip control Operations Conditions
- When the Subaru Solterra is operating in "X-MODE"
- When the shift position is set to D (Drive)
- When the parking brake has been fully released
- When the driver's door is securely closed
- When the vehicle is either stationary with the brake pedal applied or moving at a controlled speed of approximately 2 to 6 mph (2 to 10 km/h)
■ Automatic Releasing the Grip control
The Grip control system in the Subaru Solterra will automatically disengage under the following conditions to maintain safety and system reliability:
- When the vehicle is brought to a complete stop using the brake pedal
- When the vehicle speed exceeds approximately 13 mph (20 km/h)
- When the shift position is changed from D to another gear
- When the parking brake is applied
- When the driver's door is opened
- When systems such as ABS or VSC are activated
- When advanced driver assistance systems initiate brake control or power limitation (for example, Pre-Collision System or Parking Support Brake)
- When the Subaru Solterra determines that current terrain or conditions no longer allow safe Grip control operation
- When the power switch is turned OFF
■ When Grip control is not available
Grip control functionality in the Subaru Solterra may not be available in the following situations:
- When a malfunction is detected within the brake system or EV system
- Immediately after starting the EV system, before the vehicle has completed initial system checks and stabilized operation
■ Brake hold system
When Grip control is activated in the Subaru Solterra, the brake hold system is automatically turned OFF to prevent system conflicts and ensure precise traction control.
Always press the brake pedal firmly before operating the Grip control switch to avoid unintended movement, particularly when the vehicle is positioned on an incline.
After Grip control has been disengaged, the brake hold system can be reactivated as needed for normal driving convenience.
NOTICE
■ Long term usage
Extended use of Grip control in the Subaru Solterra, especially under demanding conditions, may cause the brake components to heat up. In such cases, the system may temporarily suspend operation to protect critical components and maintain long-term reliability.
■ Operation noises and vibrations
- During operation, mechanical or electronic noises may be heard from the motor compartment. These sounds are a normal part of system operation and do not indicate a malfunction in the Subaru Solterra.
- When pressing the brake pedal, the feel may differ from typical driving conditions and may appear firmer than usual. This is expected behavior and is part of the system’s control strategy.
■ When the operation indicator does not turn on in the meter even after operating the switch
If the Grip control indicator does not illuminate after activation, the Subaru Solterra system may not be functioning correctly. In this case, it is recommended to have the vehicle inspected by an authorized SUBARU service center to ensure proper operation and safety.
 Drive mode select switch
The drive modes of the Subaru Solterra can be adjusted to match different
driving conditions, ensuring optimal performance, efficiency, and comfort.
Selecting a drive mode
By pressing the drive mo ...
 Driving assist systems
In the Subaru Solterra, a range of advanced driving assist systems
work seamlessly in the background to enhance safety, stability, and overall driving
performance. These systems automatically resp ...
Other materials:
SUBARU Safety Sense
The SUBARU Safety Sense suite in the Subaru Solterra integrates a
range of advanced driver assistance technologies designed to support the driver
and enhance both safety and comfort during everyday driving. These intelligent systems
work together to help reduce collision risk, improve awarenes ...
Down Switch Inspection [Fw6 A EL]
Continuity Inspection
NOTE:
The down switch is built into the selector lever component.
1. Remove the battery cover..
2. Disconnect the negative battery cable..
3. Remove the console..
4. Disconnect the selector lever component connector.
5. Verify that the continuity betw ...
Steering Gear And Linkage Assembly
CAUTION:
To prevent damage to the steering gear, secure it to the vise using a copper
plate or clean cloth.
1. Assemble in the order indicated in the table.
1
Gear housing
2
Mounting rubber
(See Mounting Rubber Assembly No ...
