Mazda 3 Owners Manual: Gear Shift Indicator
The gear shift indicator supports you to obtain optimum fuel economy and smooth driving. It displays the selected gear position in the instrument cluster as well as notifies the driver to change to the most suitable gear position corresponding to the actual driving condition.
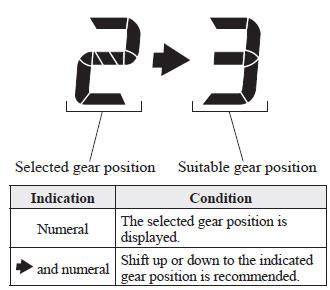
| CAUTION Do not rely solely on the shift-up/ shift-down recommendations by indications. The actual driving situation might require shift operations diff erent from indication. To avoid the risk of accidents, the road and traffi c conditions have to be judged correctly by the driver before shifting. |
NOTE The gear shift indicator turns off when the following operations are performed.
- The vehicle is stopped.
- The vehicle is put in neutral.
- The vehicle is driven in reverse.
- The clutch is not fully engaged when accelerating from a stop.
- The clutch pedal remains depressed for 2 seconds or longer while driving.
 Manual Transaxle Shift Pattern
The shift pattern of the transaxle is
conventional, as shown.
Depress the clutch pedal all the way down
while shifting; then release it slowly.
Your vehicle is equipped with a device to
p ...
 Recommendations for Shifting (for
Vehicles without Gear Shift
Indication)
Recommendations for Shifting (for
Vehicles without Gear Shift
Indication)
Upshifting
For normal acceleration, Mazda
recommends these shift points:
(U.S.A. and Canada)
For cruising, Mazda recommends these
shift points:
(U.S.A. and Canada)
Downshifting
When yo ...
Other materials:
Front Seat Back Trim Removal/Installation
WARNING:
Handling a front seat (with built-in side air bag) improperly can accidentally
operate (deploy) the air bag, which may seriously injure you. Read the service
warnings before handling a front seat (with built-in side air bag)..
CAUTION:
After removing a front seat ...
Theft Deterrent System Reading Freeze Frame Data
1. Connect the M-MDS (IDS) to the DLC–2.
2. After the vehicle is identified, select the following items from the initialization
screen of the IDS.
Select “Body”.
Select "Burglar Service Functions".
3. Then, select the following item from the screen menu. ...
Front Stabilizer Removal/Installation [Mzr 2.0, Skyactiv G 2.0, Mzr 2.5]
1. Remove the joint cover..
2. Disconnect the steering shaft from the steering gear and linkage..
3. Remove the front crossmember component..
4. Remove in the order indicated in the table.
5. Install in the reverse order of removal.
6. Inspect the wheel alignment and adjust it if necessary ...
