Mazda 3 Owners Manual: Lighting Control
Headlights
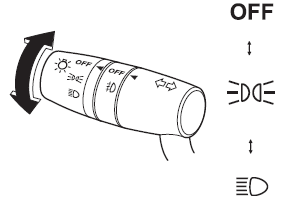
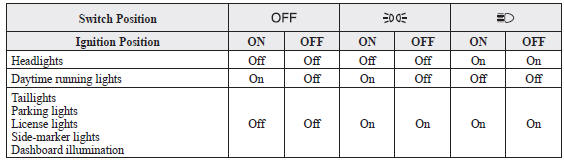
Turn the headlight switch to turn the headlights, other exterior lights and dashboard illumination on or off.
When the lights are turned on, the lights-on indicator light in the instrument cluster turns on.

NOTE
- If the light switch is left on, the lights will automatically switch off approximately 30 seconds after switching the ignition off.
- The time setting can be changed.
Refer to Personalization Features on .
- To prevent discharging the battery, do not leave the lights on while the engine is off unless safety requires them.
Without auto-light control
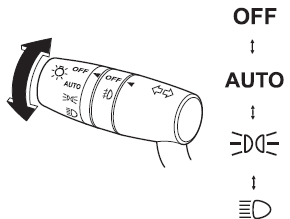
With auto-light control
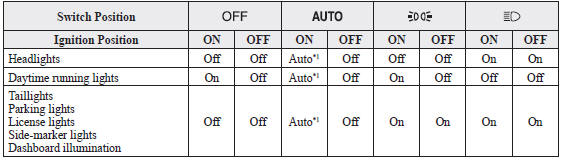
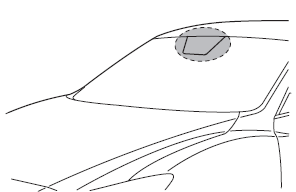
*1 The headlight and other light settings switch automatically depending on the surrounding brightness detected by the sensor.
Auto-light control
When the headlight switch is in the
 position and the ignition is
switched ON, the light
sensor senses the surrounding lightness or darkness and automatically turns the
headlights,
other exterior lights and dashboard illumination on or off (see chart above).
CAUTION
|
 position and the
NOTE
- The headlights, other exterior lights and dashboard
illumination may not turn off
immediately even if the surrounding area becomes well-lit because the light
sensor
determines that it is night time if the surrounding area is continuously
dark for several
minutes such as inside long tunnels, traffic jams inside tunnels, or in
indoor parking lots.
In this case, the lights turn off if the light switch is turned to the
 position.
 - (Without auto headlight off function)
When the headlight switch is in the
 position and the ignition is
switched to ACC or the ignition is switched off, the headlights, other exterior lights and dashboard illumination will turn off. - The dashboard illumination can be adjusted by rotating the knob
in the instrument cluster.
Also, the day/night mode can be changed by rotating the knob until a beep sound is heard.
To adjust the brightness of the dashboard illumination: Refer to Dashboard Illumination on .
- The sensitivity of the AUTO lights may be changed by an Authorized
Mazda Dealer.
Refer to Personalization Features on .
Xenon fusion headlight bulbs *
The low-beam bulbs of the headlights have xenon fusion bulbs that produce a bright white beam over a wide area.
| WARNING Do not replace the xenon fusion bulbs yourself: Replacing the xenon fusion bulbs yourself is dangerous, because the xenon fusion bulbs require high voltage. You could receive an electric shock if the bulbs are handled incorrectly. Consult an Authorized Mazda Dealer when replacement is necessary. |
NOTE If the headlights fiicker or the brightness weakens, the bulb-life may be depleted and a replacement is necessary. Consult an Authorized Mazda Dealer.

 Headlight High-Low Beam
The headlights switch between high and
low beams by moving the lever forward or
backward.
When the headlight high-beams are on,
the headlight high-beam indicator light is
turned on.
...
Other materials:
Front Tilt Motor Inspection
1. Remove the battery cover..
2. Disconnect the negative battery cable and wait 1 min or more..
3. Disconnect the front tilt motor connector.
4. Apply battery positive voltage to the front tilt motor terminals and inspect
the front tilt motor operation
If not as specified, replac ...
Power Window Subswitch Inspection
Passenger's Side
1. Disconnect the negative battery cable..
2. Remove the inner garnish..
3. Remove the front door trim..
4. Remove the power window subswitch..
5. Verify that the continuity is as indicated in the table using a tester.
If not as indicated in the table, repl ...
Rain Sensor Removal/Installation
1. Disconnect the negative battery cable..
2. Spread open the rain sensor cover in the direction of the arrows and disengage
tabs A to remove it.
3. Disconnect the rain sensor connector.
4. Slide rain sensor tab B in the direction of the arrow shown in the figure
and detach tab B. ...
