Mazda 3 Service Manual: Antenna Feeder No.5 Removal/Installation
1. Disconnect the negative battery cable..
2. Remove the following parts:
a. Front scuff plate (RH).
b. Front side trim (RH).
c. Rear scuff plate (RH).
d. B-pillar lower trim (RH).
e. Rear seat cushion.
f. Tire house trim (RH).
3. Partially peel back the floor covering.
4. Disconnect the antenna feeder No.4.
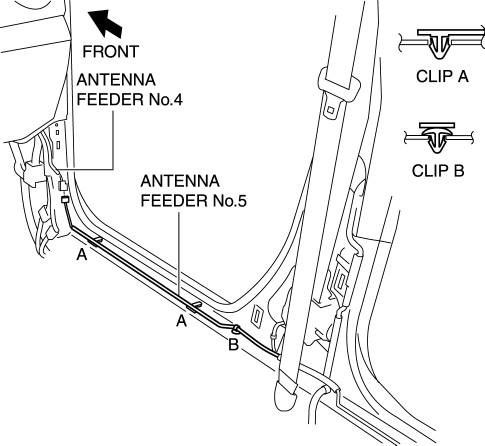
5. Remove the clips A and B.
6. Disconnect the antenna feeder No.3.
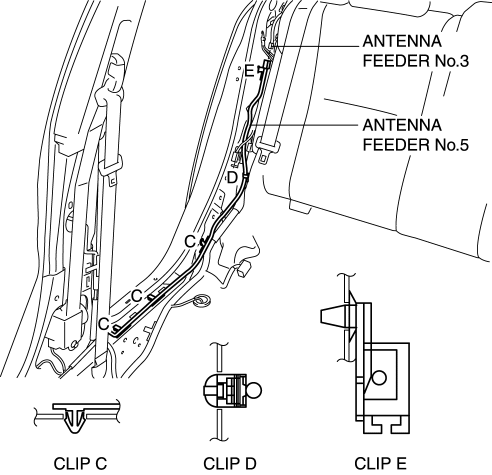
7. Remove the clips C, D and E.
8. Remove the antenna feeder No.5.
9. Install in the reverse order of removal.
 Antenna Feeder No.5 Inspection
1. Disconnect the negative battery cable..
2. Remove the following parts:
a. Front scuff plate (RH).
b. Front side trim (RH).
c. Rear seat cushion.
d. Rear scuff plate (RH).
e. Tire house ...
 Antenna Feeder No.6 Inspection
1. Disconnect the negative battery cable..
2. Remove the following parts:
a. Upper panel.
b. Shift knob (MTX).
c. Selector lever knob (ATX).
d. Shift panel.
e. Side wall.
f. Console.
g ...
Other materials:
Riding with children
When traveling with children in the Subaru Solterra, always follow
these important safety recommendations to ensure their protection and comfort during
every journey.
Always use a child restraint system that is appropriate for the child’s
age, size, and weight until they are able to correct ...
Bass Box Inspection
1. Disconnect the negative battery cable..
2. Disconnect the connector..
3. Verify the resistance between bass-box terminals.
If not within the specification, replace the bass-box.
Resistance
0.9—1.1 ohms
...
Liftgate Lower Trim Removal/Installation
1. Remove the liftgate upper trim..
2. Remove the liftgate side trim..
3. Remove the screw and fasteners.
4. Pull the liftgate lower trim in the direction of arrow (1), (2), (3), then
detach clips A, B, pin C and D from the liftgate.
5. Remove the liftgate lower trim.
6. Install ...
