Mazda 3 Service Manual: Boost Air Temperature Sensor Inspection [Mzr 2.3 Disi Turbo]
Resistance Inspection
NOTE:
-
Because the boost air temperature sensor is integrated in the MAP sensor, replacing the boost air temperature sensor includes replacement of the MAP sensor/boost air temperature sensor.
1. Remove the battery cover..
2. Disconnect the negative battery cable..
3. Remove the dipstick pipe..
4. Disconnect the MAP sensor/boost air temperature sensor connector.
5. Remove the MAP sensor/boost air temperature sensor..
6. Measure the resistance between MAP sensor/boost air temperature sensor terminals A and B.
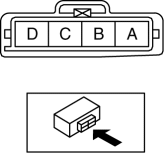
-
If not as specified, replace the MAP sensor/boost air temperature sensor..
|
Boost air temperature (°C {°F}) |
Resistance (kilohms) |
|
20 {68} |
2.31—2.72 |
|
60 {140} |
0.58—0.65 |
 Ambient Temperature Sensor Removal/Installation [Manual Air Conditioner]
1. Disconnect the negative battery cable..
2. Remove the aerodynamic under cover No.2..
3. Remove the aerodynamic under cover No.1..
4. Disconnect the connector.
5. Remove the ambient temp ...
 Manifold Absolute Pressure (Map) Sensor/Boost Air Temperature Sensor Removal/Installation
[Mzr 2.3 Disi Turbo]
Manifold Absolute Pressure (Map) Sensor/Boost Air Temperature Sensor Removal/Installation
[Mzr 2.3 Disi Turbo]
NOTE:
Because the boost air temperature sensor is integrated in the MAP sensor,
replacing the boost air temperature sensor includes replacement of the MAP sensor/boost
air temperature se ...
Other materials:
Front Drain Hose Removal
1. Set the air intake mode to FRESH.
2. Set the air mix mode to MAX COLD.
3. Disconnect the negative battery cable.
4. Remove the rain sensor cover. (Vehicles with auto light / wiper system).
5. Disconnect the rain sensor connector. (Vehicles with auto light / wiper system)
6. Partially ...
Body Control Module (Bcm) Inspection
1. Remove the following parts:
a. Front scuff plate (LH).
b. Front side trim (LH).
c. Upper panel.
d. Shift knob (MTX).
e. Selector lever knob (ATX).
f. Shift panel.
g. Side wall.
h. Console.
2. Set the hood release lever out of the way..
3. Remove the lower panel. (driver-side). ...
Parking Support Brake function (moving vehicles rear of the vehicle)
In the Subaru Solterra, the Parking Support Brake system utilizes
rear radar sensors to continuously monitor traffic approaching from either side
behind the vehicle. When a moving vehicle is detected and the system determines
that the likelihood of a collision is significant, automatic brake c ...
