Mazda 3 Service Manual: Buckle Switch Inspection
Driver Side
1. Switch the ignition to off.
2. Disconnect the negative battery cable..
3. Remove the front seat..
4. Remove the front buckle..
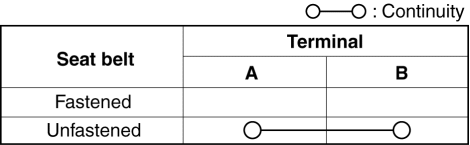
5. Inspect for continuity between the buckle switch terminals using a tester.

-
If not as indicated in the table, replace the driver side front buckle.
Passenger Side
1. Connect the M-MDS (IDS) to the DLC-2.
2. After the vehicle is identified, select the following items from the initialization screen of the IDS.
a. Select “DataLogger”.
b. Select “Modules”.
c. Select “RCM”.
3. Verify that it is displayed according to the table using “BUCKLE_P”.
|
M-MDS display |
Operation Status |
|
Unbuckled |
Passenger-side front seat belt not fastened |
|
Buckled |
Passenger-side front seat belt fastened |
-
If not as indicated in the table, replace the passenger side front buckle.
 Air Bag Module And Pre Tensioner Seat Belt Disposal Procedures
WARNING:
A live (undeployed) air bag module or pre-tensioner seat belt may accidentally
operate (deploy) when it is disposed of and cause serious injury. Always refer
to the “AIR BAG ...
 Child Restraint Seat Anchor Removal/Installation
4SD
1. Remove the cover.
2. Remove the bolt and child-restraint seat anchor.
3. Install in the reverse order of removal.
5HB
1. Remove the trunk end trim..
2. Remove the bolt and ...
Other materials:
Control Switches
AUTO switch
By pressing the AUTO switch the
following functions will be automatically
controlled in accordance with the selected
set temperature:
Airflow temperature
Amount of airflow
Selection of airflow mode
Outside/Recirculated air selection
Air conditioner operation
NOTE
AUTO ...
Sunroof Motor Removal/Installation
1. Disconnect the negative battery cable..
2. Remove the rain sensor cover. (Vehicles with auto light/wiper system).
3. Disconnect the rain sensor connector. (Vehicles with auto light/wiper system)
4. Partially peel back the seaming welts.
5. Remove the following parts:
a. Sunroof seaming ...
Plastic Part Maintenance
When cleaning the plastic lenses of the
lights, do not use gasoline, kerosene,
rectified spirit, paint, thinner, highly
acidic detergents, or strongly alkaline
detergents. Otherwise, these chemical
agents can discolor or damage the
surfaces resulting in a significant loss
in functio ...
