Mazda 3 Service Manual: Clock Spring Removal/Installation
1. Disconnect the negative battery cable..
2. Remove the driver-side air bag module..
3. Remove the steering wheel..
4. Remove the column cover.
5. Remove the connectors.
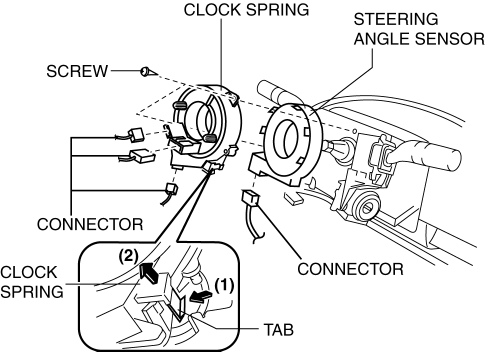
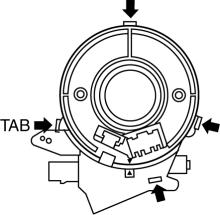
6. Remove the tab direction of the arrow shown in the figure.
7. Remove the screws.
8. Remove the clock spring.
9. Remove the steering angle sensor.
10. Install in the reverse order of removal.
11. Verify that the air bag system warning light illuminates for approx. 6 s
and goes out.
-
If the air bag system warning light does not operate in the manner described above, there are malfunctions in the system. Inspect the system using the on-board diagnostic.
Clock Spring Installation Note
CAUTION:
-
If the clock spring is not adjusted, the spring wire in the clock spring will break due to overtension when the steering wheel is turned. Always adjust the clock spring after installing it.
-
Adjust the clock spring after installing it..
Steering Angle Sensor Removal Note
-
Remove the tab shown in the figure and remove the steering angle sensor.
 Clock Spring Inspection [Two Step Deployment Control System]
1. Disconnect the negative battery cable..
2. Remove the driver–side air bag module..
3. Remove the steering wheel..
4. Remove the column cover.
5. Remove the clock spring..
6. Verify that ...
 Clock Switch Inspection
NOTE:
Clock switch built with the hazard warning switch.
1. Disconnect the negative battery cable..
2. Remove the clock switch..
3. Verify resistance between the clock switch termina ...
Other materials:
Liftgate Hinge Removal/Installation
1. Disconnect the negative battery cable..
2. Remove the following parts:
a. Rear scuff plate.
b. Rear seat cushion.
c. Rear seat back.
d. Lower anchor installation bolts on the rear seat belt.
e. Tire house trim.
f. Trunk end trim.
g. Trunk side upper trim.
h. Trunk side trim.
i ...
Inside Trunk Release Lever
(4-Door)
Your vehicle is equipped with an inside
trunk release lever that provides a means
of escape for children and adults in the
event they become locked inside the trunk.
No matter how careful adults might be
with keys and locking their cars, parents
should be aware that children may be
tempted ...
Fan Switch Inspection [Manual Air Conditioner]
1. Disconnect the negative battery cable..
2. Remove the following parts:
a. Upper panel.
b. Shift lever knob (MTX).
c. Selector lever knob (ATX).
d. Shift panel.
e. Side wall.
f. Console.
g. Front scuff plate.
h. Front side trim.
i. Dashboard under cover.
j. Glove compartment. ...
