Mazda 3 Service Manual: Engine Tune Up [Skyactiv G 2.0]
Engine Tune-up Preparation
NOTE:
-
If the accelerator pedal is depressed continuously for a specified time, the engine speed may decrease to the idle speed. This is due to the fuel cut control operation, which prevents overheating, and it does not indicate a malfunction. The engine speed returns to normal control when the accelerator pedal is released.
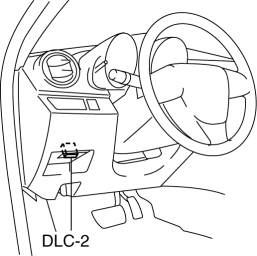
1. Connect the M-MDS to the DLC-2.
2. Shift the selector lever (ATX) or shift lever (MTX) to the following position:
-
MTX: Shift lever is in neutral position.
-
ATX: Selector lever is in P or N position.
NOTE:
-
The engine coolant temperature and oil temperature can be verified by M-MDS PID “ECT” and “OIL_TEMP”.
3. Run the engine speed at a constant 2,500 to 3,000 rpm
and warm up the engine (engine coolant temperature: 80 °C {176 °F}
or more, oil temperature: 60 °C {140 °F}
or more).
4. Turn off all electrical loads with the engine idling.
5. If the cooling fan is operating, wait until is stops.
Idle Speed Inspection
NOTE:
-
The idle speed cannot be adjusted.
-
The M-MDS is required to verify the idle speed.
1. Complete the engine tune-up preparation..
2. Verify that the idle speed (M-MDS PID: RPM) is within the specification using the PID/data monitor function of the M-MDS..
-
If there is malfunction, refer to “ENGINE SYMPTOM TROUBLESHOOTING”..
-
Idle speed (MTX: Neutral position, ATX: P, N position)
-
600—700 rpm
Ignition Timing Inspection
NOTE:
-
The ignition timing cannot be adjusted.
-
The M-MDS is required to verify the ignition timing.
1. Complete the engine tune-up preparation..
2. Verify the ignition timing (M-MDS PID: SPARKADV) using the PID/data monitor function of the M-MDS..
-
Ignition timing
-
Approx. BTDC 12°
3. Verify that ignition timing advances when the engine speed increases gradually.
-
If there is malfunction, refer to “ENGINE SYMPTOM TROUBLESHOOTING”..
Idle Mixture Inspection
1. Verify that the idle speed and ignition timing are within the specification..
2. Insert an exhaust gas analyzer into the tailpipe.
3. Verify that the CO and HC concentrations are within regulation.
-
If there is malfunction, refer to “ENGINE SYMPTOM TROUBLESHOOTING”..
-
If no malfunction is detected, replace the catalytic converter..
-
CO concentration
-
Within the regulation
-
HC concentration
-
Within the regulation
Idle-up Speed Control Inspection
NOTE:
-
The idle speed cannot be adjusted.
-
The M-MDS is required to verify the idle speed.
1. Complete the engine tune-up preparation..
2. Verify that the idle speed according to each load (M-MDS PID: RPM) is within the specification using the PID/data monitor function of the M-MDS (except idle speed decrease after applying load)..
-
If the engine speed is not within the specification when a specified load is applied, inspect the related input parts, wiring harnesses, and connectors.
-
Idle-up speed (MTX: Neutral position, ATX: P, N position)
-
A/C on: 650—800 rpm (MTX), 650—770 rpm (ATX)
-
Electrical loads on: 600—750 rpm
 Engine Tune Up [Mzr 2.3 Disi Turbo]
NOTE:
If the accelerator pedal is depressed continuously for a specified time,
the engine speed may decrease to the idle speed. This is due to the fuel cut
control operation, which preve ...
 Non Return Valve Inspection [Mzr 2.0, Mzr 2.5]
WARNING:
Fuel is very flammable liquid. If fuel spills or leaks from the pressurized
fuel system, it will cause serious injury or death and facility breakage. Fuel
can also irritate skin ...
Other materials:
Front Door Key Cylinder Switch Inspection
1. To access the glass installation bolt, position the front door glass so that
the distance from the top of the front door glass to the upper part of the front
beltline molding is approx. 80 mm {3.1 in}.
2. Disconnect the negative battery cable..
3. Remove the following parts:
a. Inne ...
Drive Belt Inspection [Skyactiv G 2.0]
Generator Drive Belt
NOTE:
The generator drive belt deflection/tension inspection is not necessary with
the adoption of the drive belt auto tensioner.
1. Verify that the indicator part of the cast hexagon on the drive belt auto
tensioner is within the normal range.
If ...
Shift-Lock System
The shift-lock system prevents shifting out
of P unless the brake pedal is depressed.
To shift from P:
Depress and hold the brake pedal.
Start the engine.
Press and hold the lock-release button.
Move the selector lever.
NOTE
When the ignition is switched to ACC or
the ignition ...
