Mazda 3 Service Manual: Joint Shaft Disassembly [Skyactiv G 2.0]
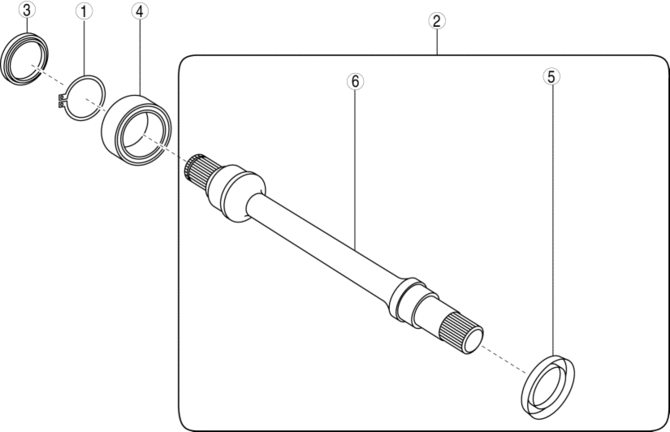
1. Disassemble in the order indicated in the table.
|
1 |
Snap ring |
|
2 |
Joint shaft component . |
|
3 |
Dust seal |
|
4 |
Bearing |
|
5 |
Dust cover |
|
6 |
Joint shaft |
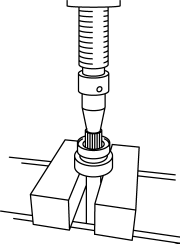
Joint Shaft Component Disassembly Note
1. After removing the snap ring, remove the dust seal and the bearing from the joint shaft component using a press.
 Joint Shaft Disassembly [Mzr 2.3 Disi Turbo]
1. Disassemble in the order indicated in the table.
1
Joint shaft component
.
2
Bearing
.
3
Dust seal (LH)
...
 Joint Shaft Inspection
1. Verify that there is no torsion or cracks on the joint shaft.
If there is any malfunction, replace the joint shaft.
2. Turn the joint shaft by hand and verify that the bearing rotates ...
Other materials:
Steering Gear And Linkage Inspection
Steering Rack Inspection
1. Inspect for cracking, damage, and tooth wear.
If there is any malfunction, replace the steering rack.
2. Measure the steering rack warp.
If it exceeds the maximum specification, replace the steering rack.
Steering rack runout
Large ...
If you think something is wrong
If you observe any unusual behavior while operating your Subaru Solterra,
it may indicate that the vehicle requires inspection, adjustment, or repair. Promptly
contacting an authorized SUBARU dealer is strongly recommended to ensure continued
safety and reliability.
Visible symptoms
Fluid ...
PCM Configuration [Mzr 2.0, Mzr 2.5]
CAUTION:
If the wheel and tire sizes are changed, a discrepancy with the speedometer
needle whereby it exceeds the allowable range could result in a malfunction.
If the wheel and tire sizes are changed, perform the following procedure to
change the tire size parameter setting..
...
