Mazda 3 Service Manual: Clutch Pedal Position Switch Removal/Installation [C66 M R]
1. Remove the battery cover..
2. Disconnect the negative battery cable..
3. Disconnect the clutch pedal position switch connector.
4. Remove the clutch pedal position switch from the pedal bracket.
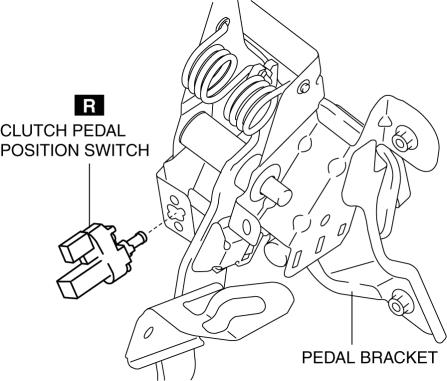
5. Insert a new clutch pedal position switch into the pedal bracket hole until the switch stops.
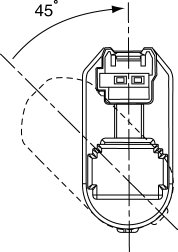
6. Rotate the clutch pedal position switch 45° clockwise.
7. Verify that the clutch pedal position switch is locked securely.
8. Install in the reverse order of removal.
 Clutch Pedal Position (CPP) Switch Inspection [Mzr 2.0, Mzr 2.5]
Continuity Inspection
1. Verify that the CPP switch is installed properly..
2. Remove the battery cover..
3. Disconnect the negative battery cable..
4. Disconnect the CPP switch connector..
5 ...
 Clutch Pedal Removal/Installation [C66 M R]
CAUTION:
Secure the steering wheel using tape or a cable to prevent the steering shaft
from rotating after disconnecting the steering shaft. If the steering wheel
rotates after the steer ...
Other materials:
Active Command Modes Inspection [Instrument Cluster]
1. Connect the M-MDS (IDS) to the DLC-2.
2. After the vehicle is identified, select the following items from the initialization
screen of the IDS.
a. Select “DataLogger”.
b. Select “Modules”.
c. Select “IC”.
3. Select the simulation items from the PID table.
4. Perform ...
Front Seat Belt Pretensioner and Load Limiting Systems
For optimum protection, the driver and
front passenger seat belts are equipped
with pretensioner and load limiting
systems. For both these systems to work
properly you must wear the seat belt
properly.
Pretensioners:
When a collision is detected, the
pretensioners deploy simultaneously wit ...
M Position Switch Inspection [FS5 A EL]
1. Perform the following procedures.
a. Remove the battery cover..
b. Disconnect the negative battery cable.
c. Remove the console..
d. Disconnect the selector lever component connector.
2. Inspect the continuity between the selector lever component terminals A and
H.
If ...
