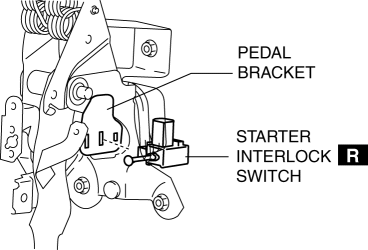
Mazda 3 Service Manual: Starter Interlock Switch Removal/Installation [C66 M R]
1. Remove the battery cover..
2. Disconnect the negative battery cable..
3. Disconnect the starter interlock switch connector.
4. Remove the starter interlock switch from the pedal bracket.
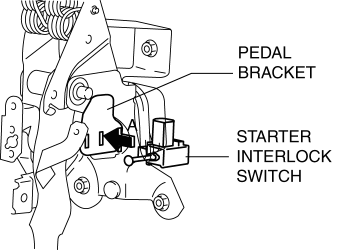
5. Insert a new starter interlock switch into the pedal bracket hole in the direction indicated by arrow A.
6. Slide the starter interlock switch pressing it in the direction indicated by arrow B until it is locked.
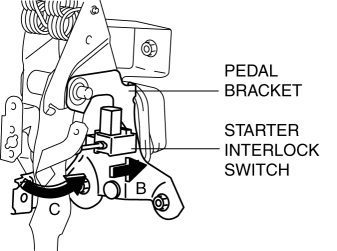
7. Fully depress the clutch pedal in the direction of arrow C, and verify that a click sound from the starter interlock switch is heard.
8. Install in the reverse order of removal.
9. Fully depress the clutch pedal, and verify that the engine starts.
 Starter Interlock Switch Inspection [Skyactiv G 2.0]
CAUTION:
Do not reuse the starter interlock switch if it is removed from the vehicle
even once. Replace with a new starter interlock switch when installing.
1. Remove the battery cove ...
 TCM Configuration [Fw6 A EL]
NOTE:
The TCM is built into the control valve body.
1. Verify TCM configuration implementation necessity for replacement parts.
Replacement part
Conf ...
Other materials:
Starter Cut Relay Inspection [MTX]
Advanced Keyless Entry And Push Button Start System Only
1. Disconnect the negative battery cable.
2. Remove the following parts:
a. Front scuff plate (LH).
b. Front side trim (LH).
c. Side wall.
d. Console.
3. Set the bonnet release lever out of the way..
4. Remove the lower panel.. ...
Input/Turbine Speed Sensor Removal/Installation [FS5 A EL]
CAUTION:
Always use a new bolt. If the removed input/turbine speed sensor installation
bolt is reused, it may cause oil leakage.
A sealant coating is applied to the input/turbine speed sensor installation
bolt to prevent oil leakage from the installation bolt hole which passes ...
Theft Deterrent System Reading Freeze Frame Data
1. Connect the M-MDS (IDS) to the DLC–2.
2. After the vehicle is identified, select the following items from the initialization
screen of the IDS.
Select “Body”.
Select "Burglar Service Functions".
3. Then, select the following item from the screen menu. ...
