Mazda 3 Service Manual: Pilot Bearing Inspection [G66 M R]
1. Perform the following procedures.
a. Remove the battery cover..
b. Disconnect the negative battery cable.
c. Remove the battery component. (ex: battery, battery tray and PCM component).
d. Remove the air cleaner component..
e. Remove the exhaust manifold insulator installation bolts and set the exhaust manifold insulator aside.
f. Remove the exhaust manifold bracket..
g. Remove the front splash shield..
h. Remove the aerodynamic under cover No.2..
i. Remove the starter..
j. Drain the transaxle oil into a suitable container..
k. Remove the manual transaxle..
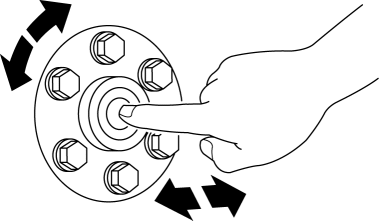
2. Without removing the pilot bearing, turn the bearing while applying force in the axial direction.

-
If there is any malfunction, replace the pilot bearing..
 Pilot Bearing Inspection [G35 M R]
1. Perform the following procedures.
a. Remove the battery cover..
b. Disconnect the negative battery cable.
c. Remove the battery component. (ex: battery, battery tray and PCM component).
d. ...
 Selector Lever Inspection
1. Switch the ignition to ON.
2. Perform the following procedures to inspect the selector lever.
If there is any malfunction, adjust the selector cable..
a. Verify that the selector le ...
Other materials:
Clock Switch Inspection
NOTE:
Clock switch built with the hazard warning switch.
1. Disconnect the negative battery cable..
2. Remove the clock switch..
3. Verify resistance between the clock switch terminals.
If the resistance is not as specified, replace the clock switch.
Between t ...
Seat Warmer
The front seats are electrically heated. The
ignition must be switched ON.
Press the seat warmer switch to illuminate
the indicator light while the ignition
is switched ON. The mode changes as
follows each time the seat warmer switch
is pressed.
WARNING
Be careful when using t ...
Storage Compartments
WARNING
Keep storage boxes closed when
driving:
Driving with the storage boxes open is
dangerous. To reduce the possibility of
injury in an accident or a sudden stop,
keep the storage boxes closed when
driving.
Do not put articles in storage spaces
with no lid:
...
