Mazda 3 Owners Manual: Automatic Transaxle Controls
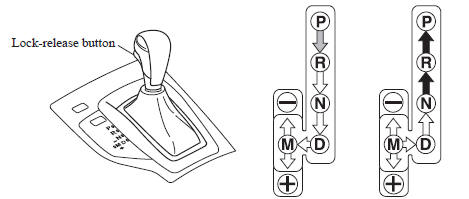
Various Lockouts:
 Indicates that you must depress
the brake pedal and hold in the lock-release
button to shift (The ignition must be switched ON).
 Indicates the shift lever can be
shifted freely into any position.
 Indicates that you must hold in
the lock-release button to shift.
NOTE The Sport AT has an option that is not included in the traditional automatic transaxle that gives the driver the option of selecting each gear instead of leaving it to the transaxle to shift gears. Even if you intend to use the automatic transaxle functions as a traditional automatic, you should also be aware that you can inadvertently shift into manual shift mode and an inappropriate gear may be retained as the vehicle speed increases. If you notice the engine speed going higher or hear the engine racing, confirm you have not accidentally slipped into manual shift mode .
- Shift Position Indication
- Active Adaptive Shift (AAS)
- Shift-Lock System
- Shift-Lock Override
- Manual Shift Mode
- Direct Mode
- Driving Tips
 Recommendations for Shifting (for
Vehicles without Gear Shift
Indication)
Recommendations for Shifting (for
Vehicles without Gear Shift
Indication)
Upshifting
For normal acceleration, Mazda
recommends these shift points:
(U.S.A. and Canada)
For cruising, Mazda recommends these
shift points:
(U.S.A. and Canada)
Downshifting
When yo ...
 Shift Position Indication
The selector position is indicated when the
ignition is switched ON.
Gear position indication
In manual shift mode, the “M” of the shift
position indication illuminates and the
numeral for ...
Other materials:
LDA (Lane Departure Alert)
Basic functions
In the Subaru Solterra, the Lane Departure Alert (LDA) system is designed to
assist the driver by monitoring the vehicle’s position relative to lane markings
or road boundaries*. When the system detects a potential deviation, it provides
timely warnings and can also apply ge ...
Liftgate Lower Trim Removal/Installation
1. Remove the liftgate upper trim..
2. Remove the liftgate side trim..
3. Remove the screw and fasteners.
4. Pull the liftgate lower trim in the direction of arrow (1), (2), (3), then
detach clips A, B, pin C and D from the liftgate.
5. Remove the liftgate lower trim.
6. Install ...
Up Switch Inspection [Fw6 A EL]
Continuity Inspection
NOTE:
The up switch is built into the selector lever component.
1. Remove the battery cover..
2. Disconnect the negative battery cable..
3. Remove the console..
4. Disconnect the selector lever component connector.
5. Verify that the continuity betwee ...
